

How To Install Safe Exam Browser On Windows 10
This document is a step by pace tutorial that explains how to set up SEB for Windows and run secure online-exams in a learning management system (LMS).
Step 1: SEB download
Download the near recent SEB version from the download area as a zilch file (e.g. seb_1.9.1_win.zilch ). Until version 1.4.1, the zip file contains the program files SebStarter.exe and MsgHook.dll for manual copying to the hard disk drive. From version 1.vii, the zip file instead contains an msi file SebWindowsInstall.msi for the Microsoft Installer, which performs a real installation and automatically copies the program files to the right places.
From version 1.5, SEB for Windows requires the runtime surroundings Microsoft .Internet, which is already installed on almost Windows computers, but not always the newest version. For most SEB components, i.e. on the exam computers, the version .Net 3.5 is sufficient. It is automatically independent in the operating arrangement for Windows vii, but not necessarily for Windows XP. The optional tool SebWindowsConfig.exe (encounter below) requires the newest version .Net 4.0 - but simply on the computer where the instructor configures SEB.
Therefore check in the listing of programs ("Contol Panel" -> "Add / Remove Programs" or "Programs" -> "Uninstall a Plan") which .NET versions are already installed on your machine; they are named "Microsoft .NET Framework x.y". If the .NET 3.five framework is notwithstanding missing in the list, yous tin can download and install it here:
http://www.microsoft.com/en-united states/download/details.aspx?id=25150
Footstep ii: SEB configuration
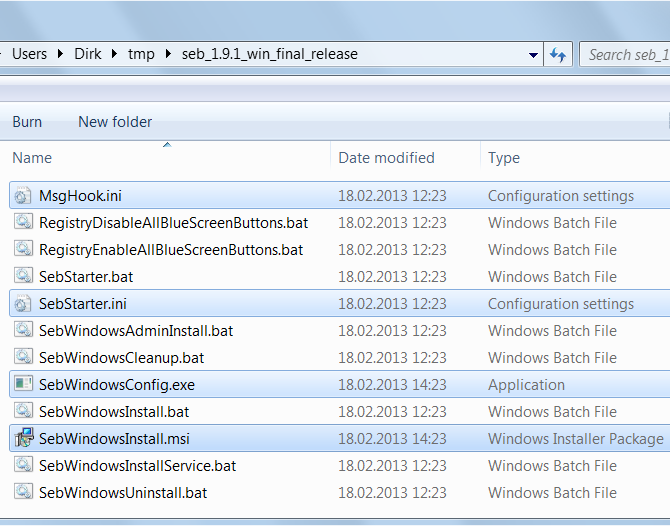
Unpack (in the part of the teacher) the downloaded nix file, due east.g. seb_1.9.1_win.nada , to an arbitrary folder of your hard bulldoze. IMPORTANT: Do non double-click the zip file, because this but displays its contained files rather than really extracting it. Instead, correct click the nix file and select the selection Extract All... in the opening context carte du jour. This unpacks the zip file into a new directory seb_1.9.1_win / . In the Explorer (File Director), switch to this directory:
Configure SEB by modifying the files MsgHook.ini and SebStarter.ini . From Version ane.8, you lot can practice that comfortably via mouse clicks using the delivered tool SebWindowsConfig.exe (provided that you accept installed .Internet iv.0 on your configuration estimator). Most important is setting the starting folio of your exam (http://...) in the category Online exam in the input field Examination URL , and defining the function keys for quitting SEB in the category Leave sequence . You can find more details about the configuration in the User Manual.
Alternatively (and in older versions), you can load the ini files into an arbitrary ASCII text editor (e.g. Notepad) and modify them in that location. The starting folio of your exam (http://...) is located in the line ExamUrl=...or URL_EXAM=... of the file SebStarter.ini . The function keys for quitting SEB are defined in an encoded manner in the lines B1=..., B2=..., and B3=... of the file MsgHook.ini . You tin can find the verbal encoding scheme in the User Manual. Just when using the SebWindowsConfig.exe tool, you lot tin can directly check the function keys without having to deal with the encoding; the encoding happens automatically.
In order to acknowledge farther programs in SEB, you can additionally edit the file SebStarter.bat and enter the paths to the permitted applications there, for SEB can find these applications. Further options are documented in the User Manual.
Step 3: SEB deployment
As soon as you have adapted the configuration files to your needs, pack together a new zip file. In club to do this, marking the files
MsgHook.ini
SebStarter.ini
SebWindowsInstall.msi
of the directory using Ctrl cardinal and left mouse key, press the correct mouse push button, select "Send to" > "Compressed (zipped) folder", and input e.thou. SebWindowsInstall.zip every bit file name.
REMARK : If you want to admit boosted programs in SEB, you eventually need the file SebStarter.bat . You must then pack this file into the zippo file, too.
Y'all can distribute the resulting zip file to your students (e.g. for exams on private notebooks) or by deployment via administrator services into a computer classroom. Please tell your students to keep the extracted zero File (Source Directory) on their hard disk drive even after installation (see Stride 4).
From Version ane.7
Alternatively, a distribution via Authoritative Install is also possible. You lot (the teacher) have to phone call the script SebWindowsAdminInstall.bat by right-click and "Run as administrator". This creates a then-called Source Epitome, i.e. a new subdirectory called SebWindowsAdminImage , and copies the three modified configuration files into this source prototype. You can then make this source image available on a network drive.
Step 4: SEB installation
Until Version ane.4.1 (obsolete)
SEB does not necessarily need to be installed in the program binder (e.1000. C:\Programme Files). You tin can install it in an arbitary folder. In any instance, you can create a shortcut to SEB on the Windows desktop by right-clicking on the ...\SEB\Seb.exe file and so choosing Transport to > Desktop (create shortcut).
If you choose this (simple, but obsolete) SEB variant, you lot need no installer, but must waive the service SebWindowsService.exe (see beneath), which tin conciliate important security-relevant options similar the Task Manager, which is desirable for many online exams.
From Version 1.vii
On the exam computers, the distributed SebWindowsInstall.zip file must be unpacked, or the source image must be downloaded, respectively. Afterwards, the actual installation can take place by double-click on the SebWindowsInstall.msi file. The installation process is simple and self-explanatory. After successful installation, the two subdirectories SebClient\ and SebWindowsService\ are residing in the installation directory, e.chiliad. in
C:\Plan Files (x86)\ETH Zurich\SEB Windows 1.ix.1
At the end of the installation process, a shortcut to SEB on the Windows desktop is created. Furthermore, the service SebWindowsService.exe is automatically started in the background at the end of the installation.
Important: For a later uninstallation of SEB, the current SEB version 1.ix.0 requires that the Source Directory (= the directory unzipped from the SebWindowsInstall.zip file and containing the SebWindowsInstall.msi file and .ini files) must remain on the hard disk of the target machine and should not exist moved or renamed. Otherwise, when uninstalling via Control Panel, the directory containing the .msi file cannot be establish and the uninstallation might therefore neglect. So the students should be instructed to continue the Source Directory on their hard disk even after installation.
Step 5: SEB execution
- Caution: Before you start SEB, make sure you call up the key combination to exit the browser! The default is F3_F11_ F6.
- Get-go SEB by double-clicking on SebStarter.exe (residing in the installation directory under ...\SebClient\Release ), or by double-clicking on the previously created shortcut to SebStarter.exe on your Windows Desktop. Caution: If additional permitted applications have been defined in the SebStarter.bat, SEB must be started by double-clicking on SebStarter.bat rather than SebStarter.exe!
- End SEB past pressing the fundamental combination (press the defined keys in the divers social club and keep them pressed for a moment).
Source: https://safeexambrowser.org/windows/win_quickguide_v1.9.1_en.html
Posted by: burkeawking.blogspot.com
0 Response to "How To Install Safe Exam Browser On Windows 10"
Post a Comment